
How to set up a Sign-in Flow Only in Custom Policy in Azure Active Directory B2C?


Priya
1416
Points
41
Posts
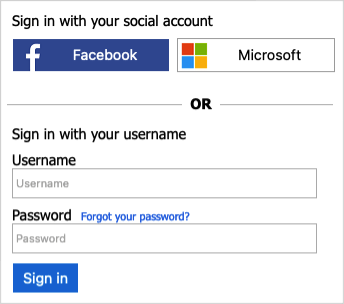
In the User Flow policy, there is a Sign-In Flow that allows users to:
- Sign in with an Azure AD B2C Local Account
- Sign in using a social account
- Reset their password
However, users cannot sign up for an Azure AD B2C Local Account through this flow. To create an account, an administrator can do so via the Azure portal or Microsoft Graph API. In this article we will see how we can configure/set-up Sign-in flow in custom policy
Prerequisites
- You have already registered a web application in Azure Active Directory B2C.
- You have already Completed the steps in Create user flows and custom policies in Azure Active Directory B2C.
Remove the sign-up link
- Open the extensions file of your policy. For example, LocalAccounts/TrustFrameworkExtensions.xml.
- Find the ClaimsProviders element. If the element doesn't exist, add it.
- Add the following claims provider to the ClaimsProviders element:
<!--
<ClaimsProviders> -->
  <ClaimsProvider>
    <DisplayName>Local Account</DisplayName>
    <TechnicalProfiles>
      <TechnicalProfile Id="SelfAsserted-LocalAccountSignin-Email">
        <Metadata>
          <Item Key="setting.showSignupLink">false</Item>
        </Metadata>
      </TechnicalProfile>
    </TechnicalProfiles>
  </ClaimsProvider>
<!--
</ClaimsProviders> --> - Within <BuildingBlocks> element, add the following ContentDefinition to reference the version 1.2.0, or newer data URI:
<!--
<BuildingBlocks>
  <ContentDefinitions>-->
    <ContentDefinition Id="api.localaccountsignup">
      <DataUri>urn:com:microsoft:aad:b2c:elements:contract:unifiedssp:1.2.0</DataUri>
    </ContentDefinition>
  <!--
  </ContentDefinitions>
</BuildingBlocks> -->
Update and test your custom policy
- Sign in to the Azure portal.
- If you have access to multiple tenants, select the Settings icon in the top menu to switch to your Azure AD B2C tenant from the Directories + subscriptions menu.
- Choose All services in the top-left corner of the Azure portal, and then search for and select App registrations.
- Select Identity Experience Framework.
- Select Upload Custom Policy, and then upload the policy file that you changed, TrustFrameworkExtensions.xml.
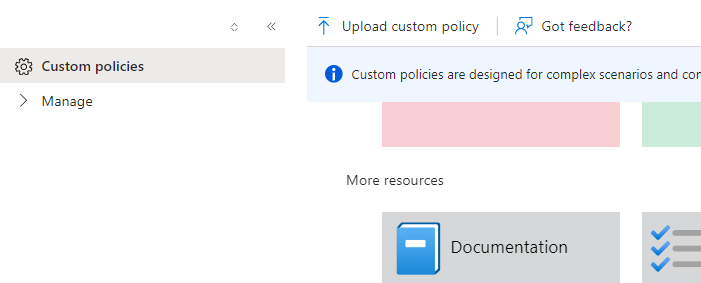
- Select the sign-in policy that you uploaded, and click the Run now button.
- You should be able to sign in with the account that you created (using MS Graph API), without the sign-up link.
Conclusion
In this article we discussed how to set-up only Sign-in Flow in custom policy. It's very easy to impletement.
0 Comments


Blog
Active User (0)
No Active User!
